This Feature Story appeared in the Keeping Ken Ken News! on June 17, 2003.
![]() Keeping Ken
Keeping Ken ![]() Ken News Feature Archive
Ken News Feature Archive
 |
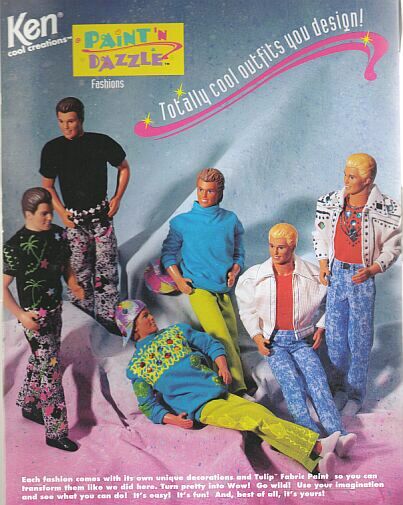
Create Outrageous Fashions! Ken® Cool Creations™ Paint 'n Dazzle™ Fashions! Totally cool outfits you design! |
Pictured Above: Paint 'N Dazzle Ken doll fashions pictured on the packaging back. |
Historically, fabric
painting has been popular in the Far East for many centuries.
Although dyes were first developed around 1850 that were appropriate
for dyeing silk, it was not until around 1920 that silk painting
started to develop as we know it today. Interestingly, Russian
emigrants who had fled to Paris earned a living designing and
painting exquisite men's silk handkerchiefs. Experimenting, they
began to paint on silk fabric in the hopes of developing other items
for sale and silk painting was born. It soon evolved into painting
on other items such as scarves and wall hangings and grew from
there.
At the end of WWII, with supplies scarce and money tight, designers and the French women for whom they designed looked for ways to express their delight in the achievement of peace. They turned to decorative scarves to symbolize the times. Famous artists were commissioned to design silk: Henry Moore, Alexander Calder, Henri Matisse and many others. This creative and competitive pressure to produce fresh new ideas for the textile and fashion industry was the main ingredient needed to develop the medium of silk painting. Artists constantly experimented, manipulating the techniques and sharing knowledge, until silk painting emerged as a popular creative expression. Today, it appeals to many because it allows everyone to create their own original work and does not necessarily require refined drawing skills. A surge in interest by Western artists has generated a bonanza of new products designed to make the process easier and more attractive to the novice. Faster, less involved dye setting and easier creative tools have helped to make silk painting one of the most popular fabric-related art forms today. Source: http://www.paintingtalk.com |
Western novice artists weren't limited to silk as a backdrop to their artistic endeavors. For a small outlay on a few colors and a suitable brush, fabric painting opened up endless opportunities for transforming your wardrobe and your home. It enabled the artist to create one-of-a-kind pieces of wearable art (t-shirts are the most common) or to design some special cushion covers, curtains, or a wall hanging.
Fabric Art hit its most popular peak during the early 1990's. Suddenly, t-shirts with artistic expressions became part of most women's weekend apparel. Fabric Art would follow earlier novice art expressions like paint-by number in the fifties, macramé in the seventies and ceramic art in the eighties...and become just as popular. But Fabric Art took the artist to a more personalized level, because the canvas to create your masterpiece was a blank piece of material. Not only that, it was "wearable art".
 |
Mattel jumped into the Fabric
Art popularity by creating canvases for their novice consumer artists as
well. Four Paint 'N Dazzle Barbie® dolls were produced (Box date
1993) . You could choose from either three Caucasian dolls with
different color hair (Blonde, Redhead and a Brunette) or a Black
doll. Each doll wears a different fashion and every doll has her own
unique accessories and Tulip Fabric Paint for a different way to decorate.
"Squiggle on the paint. Then add some decorations. It's easy! It's
fun! And, best of all it's yours. You decide how you want Barbie to look!"
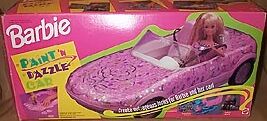
A Paint 'N Dazzle Barbie® convertible was also available. It came
with two pieces of jersey like material (pink and blue) that could be
decorated then stretched over the convertible. Then you put a clear
top over the fabric to hold it in place.
Pictured Left: Paint 'N Dazzle Barbie (Redhead). Below: Paint 'N Dazzle Car. |
|
 |
Three different Paint 'N Dazzle fashions were available for Ken® doll in 1993.
|
|
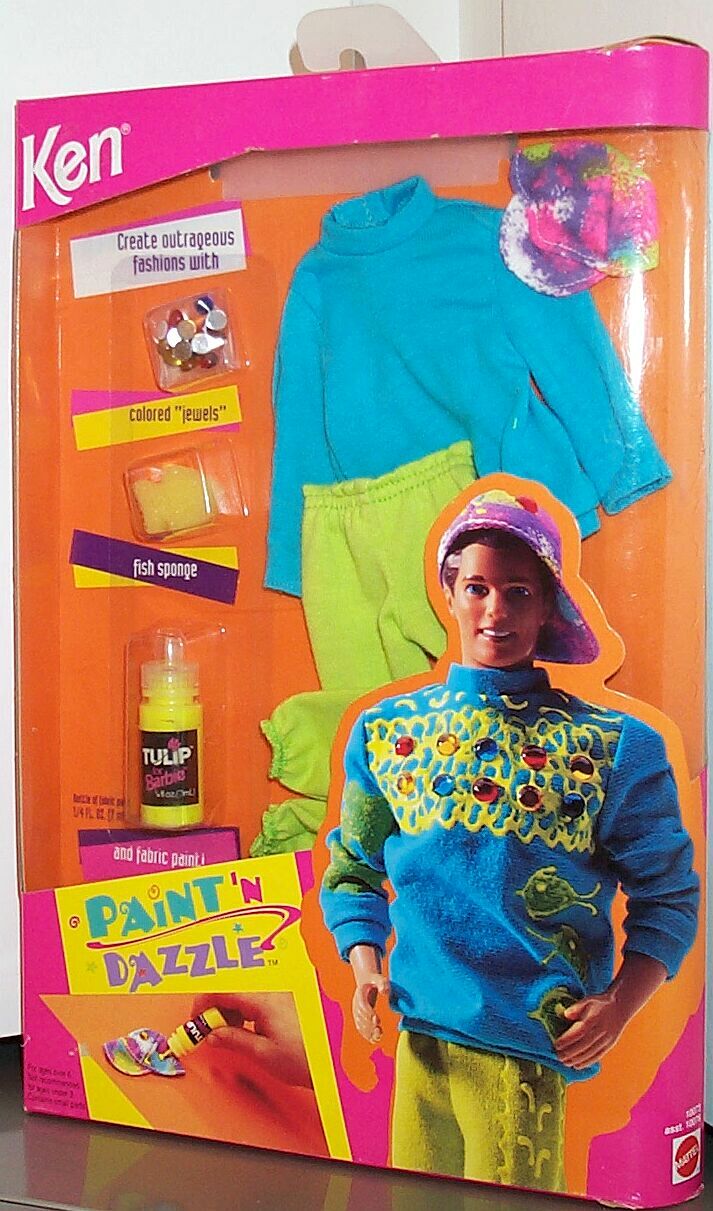
Paint 'n Dazzle Fashion #10073 This knit separates fashions features a brunette doll with a 1991 Modified Alan™ head mold on the packaging front. The lime green pants are paired with a turquoise long-sleeve shirt and a multi-neon color baseball cap. Fabric Art Accessories: Multi color "jewels". Fish shape sponge. Neon yellow Tulip brand fabric paint. |
|
|
|
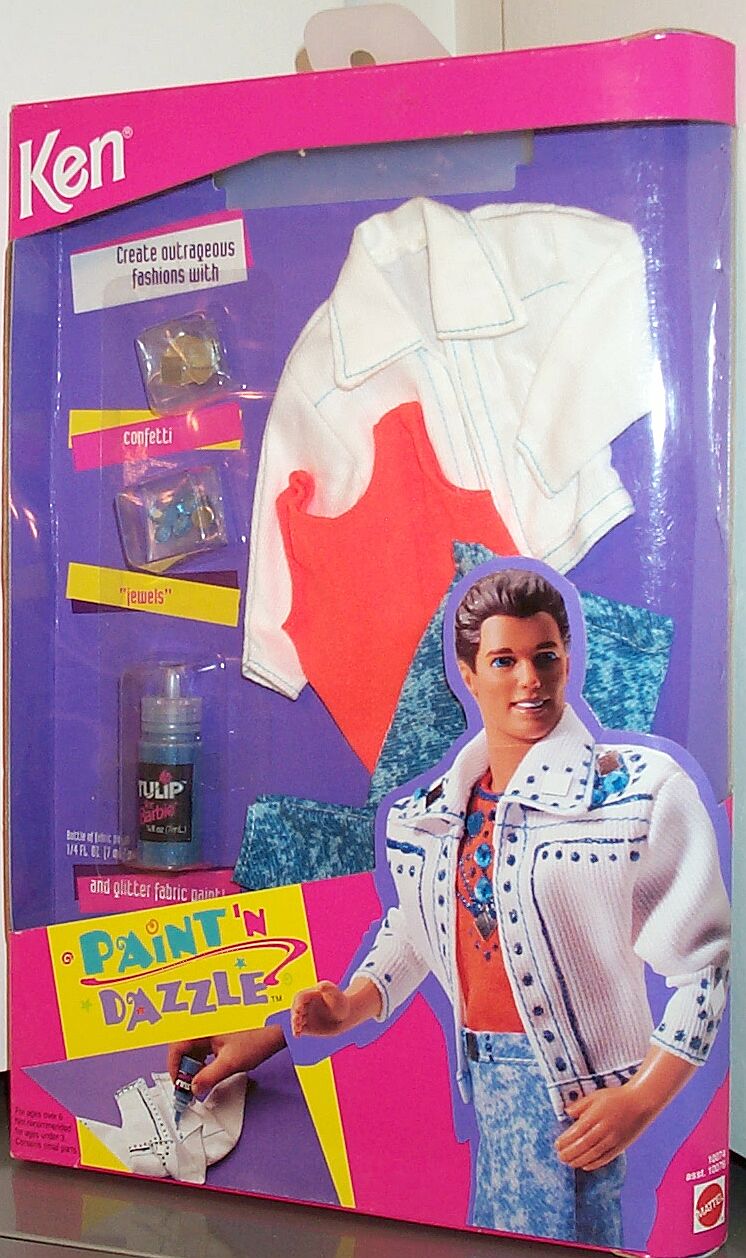
Paint 'n Dazzle Fashion #10074 This three-piece fashion features the same brunette doll with a 1991 Modified Alan™ head mold on the packaging front. Acid washed "jeans" are paired with a neon orange tank and white jacket. Fabric Art Accessories: Silver rectangle shape confetti. Light blue "jewels". Sparkle blue Tulip brand fabric paint. |
|
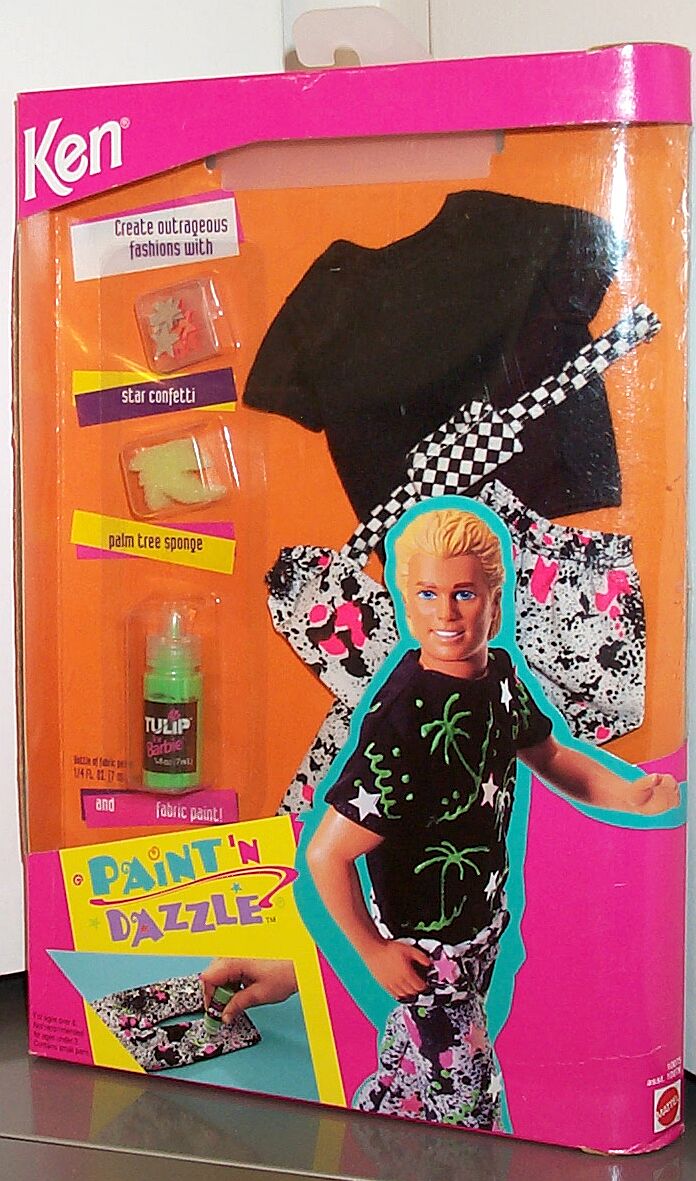 |
Paint 'n Dazzle Fashion #10075 This woven/knit combo fashion features a blonde doll with a 1990 Alan™ head mold on the packaging front. Black/hot pink print pants are paired with a black short-sleeve t-shirt and a black/white check waist pack. Fabric Art Accessories: Multi color star shape confetti. Palm tree shape sponge. Green Tulip brand fabric paint. |
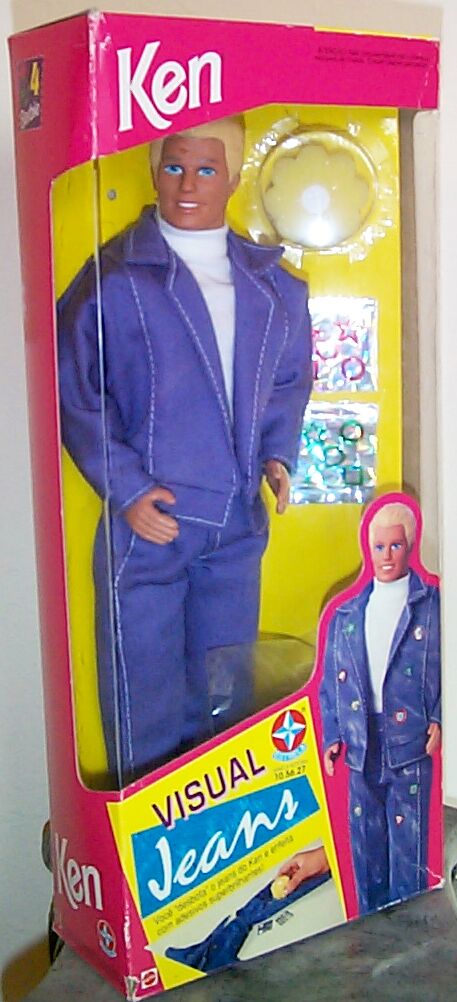
| It is interesting to note
that a Paint 'N Dazzle Ken® doll wasn't included in the
domestic market line, but Paint 'N Dazzle Ken® fashions were produced
anyway. It is probably fair to assume that one was designed,
put never produced for the domestic market. The design may
have been transferred or incorporated for Visual Jeans Ken (Brazil)
Model # 10.56.27 (Box date 1993). This doll was available the
same year as the Paint 'N Dazzle Barbie® dolls and Paint 'N Dazzle
Ken® doll fashions were available on the domestic market. Made by Estrela
in Brazil under license from Mattel, a Visual Jeans Ken® and Barbie® doll
were produced. Both dolls were only available in Brazil.
Visual Jeans Ken® doll has painted blonde hair and uses the 1991 Modified Alan head mold. His outfit consists of medium purple single pleated pants with white stitching and a matching jacket. A sleeveless white knit turtle neck shirt is also included with white lace-up Tennis shoes. The Visual Jeans Barbie® doll has a matching outfit (vest and skirt) made of the same with the same purple fabric with a white lace top. While Fabric Art was still the theme, a yellow flower shaped sponge with white chalk center replaced the Tulip Fabric Paint. When dampening the sponge, you can apply the chalk to the fabric. This effect made the purple outfit look more "broken-in" or worn. Two sheets of prismatic stickers with red or green shapes were also included to add more dramatic effects the the outfit. Pictured Right: Visual Jeans Ken. Below: Visual Jeans Barbie and Ken dolls, pictured on the back box packaging.
|
 |
With the 1993 Paint 'N Dazzle line, Mattel proved once again that the were "in-the-know" about the latest fashion trends. While these fashions may seem over-the-top by today standards, remember, this was only 10 years ago. Like most Barbie® and Ken® dolls, this important, piece of fashion history craze will forever be captured in this line.
Want to relive the Fabric Art craze all over again? Here are some tips to reacquaint yourself.
|
10 Tips for Fabric Painting by Marion Boddy-Evans at http://painting.about.com/mbody.htm
Fabric Painting Tip 1. Will
anything less than 100 per cent do? Fabric Painting Tip 2. Tight is
bright Fabric Painting Tip 3. To prewash
or not to prewash? Fabric Painting Tip 4. Skip the
softener Fabric Painting Tip 5. Get rid of
wrinkles Fabric Painting Tip 6. The heat is
one Fabric Painting Tip 7. Go with the
flow Fabric Painting Tip 8. Tread
softly Fabric Painting Tip 9.
Bleached-out colors Fabric Painting Tip 10. One-sided
designs |